Sometimes it feels like you have the whole blog post mapped out in your head. Until you sit down to write, and instead of typing furiously on your keyboard, you are tapping anxiously on your desk. Staring at a blank screen!
A looming deadline only heightens the anxiety. It makes it even harder to find that missing spark and recall those ideas that have been buzzing in your mind ever since you conceived the idea for the post. We have all been there.
The best hack to beat the blank page syndrome that every writer dreads is by using a blog post outline.
This article will show you how to write a blog post outline quickly. You will learn how to draw a roadmap for an article that explores every relevant sub-topic and engages readers from start to end.
Even better, we will share a tool that will generate the blog article outline for you with a simple click of a button, drastically cutting the time you will take doing it manually.
Whether you’re a seasoned blogger or just starting out, this blog outline template will empower you to craft article outlines that lay the foundation for successful blog posts.
Table Of Contents:
- Why It’s Important to Write Blog Post Outlines
- How to Write a Blog Post Outline Quickly and Efficiently
- Outline Your Thoughts with Mind Mapping
- Crafting Compelling Titles for Your Blog Posts
- Structuring Your Blog Post Outline
- A Step-by-Step Guide to Writing a Blog Post Outline
- FAQs – How to Write a Blog Post Outline
- Conclusion
Why It’s Important to Write Blog Post Outlines
Imagine walking into an unknown forest without a map. That’s what it feels like to dive headfirst into writing a blog post without creating an outline first. You might end up lost, confused, and with more than just a few bug bites.
I have never had a photographic memory, so it beats me why I ever thought I could commit an article’s worth of information to memory and recall it on demand.
A blog post outline, much like that trusty map, guides you through your content creation journey in an organized manner. It helps clarify your main points and ensures each section flows smoothly into the next.
A blog article outline can be a simple bulleted list of points that summarize each section of the post. Or it can be a more detailed breakdown that has the main points standing as guideposts, with supporting points nestled underneath.
The benefits of using an outline for article writing are enormous.
For starters, blog outlines help you save time by organizing your thoughts before you start writing. They also provide structure for your ideas and make sure all necessary information is included.
Using an outline to guide you focuses your mind and stops you from wandering off-topic. Some of your readers have busy schedules so it helps if they can scan your article and quickly find the information they are seeking.
The sheer mess of an article that hops from one topic to another without a connecting thread makes for a terrible reading experience. It turns away readers if they can find any in the first place.
But as well as the reader, you could lose Google too. Simply because the search engine just cannot understand what your article is about and can’t decide which searches to serve it for. You end up addressing an empty room.
When I outline my articles I also find that my writing is faster and less labored. An outline simplifies the writing process. All you will have to do is:
- Expand on your main arguments.
- Add a few examples to clarify the point.
- Add images to help readers visualize your proposed solution.
- Tie in a few personal stories to engage your readers’ brains.
- Link out to articles that cover the subtopics in greater detail.
- Add transitions between each point so the article flows and reads well.
An effective blog post is not only well-structured but strategic too — a quality that starts with its skeleton (the blog post outline).
Creating outlines encourages purposeful thinking about not only how to present information but also why certain aspects should come before others based on their relevance or importance.
In essence, blog outlines ensure that the final product is cohesive and flows logically from the introduction to the summary. As I have found, an outline makes me a better, more efficient writer.
Learning how to write a blog post outline ensures that you are making your point clear from the get-go —reducing the amount of time staring at blank screens or scrapping entire sections because they don’t fit with everything else you’ve written.
How to Write a Blog Post Outline Quickly and Efficiently
Writing a blog post outline is usually a manual process. You start with a topic or your main goal for the article. And then you expand on it with the other takeaways you want your readers to get from the article.
You want to get all of your ideas down, including the questions people commonly ask about the topic. After this brain dump, you will now organize and arrange your article’s main points into a structured, flowing outline.
As you can imagine, this manual outlining process can take time. And without thorough research, it is easy to miss important points. Your article won’t be as comprehensive.
This is what the BrandWell AI fixes.
BrandWell streamlines content production, taking care of the whole blog post workflow, from the outline, the actual writing, and optimization, to publishing in WordPress.
As we will show you, the best way to outline your blog post is with the BrandWell automatic blog outline generator.
If you prefer video, watch over-the-shoulder as BrandWell’s President, Julia McCoy, demonstrates the process.
Outline Your Thoughts with Mind Mapping
Mind mapping is a dynamic way to organize your thoughts and streamline the outlining process. This approach gives you an eagle’s eye view of your content, letting you spot gaps in information and opportunities for expanding on interesting ideas.
The beauty of mind mapping lies in its visual nature. It provides a tangible structure that mirrors how our brains naturally work — branching out from one main idea into multiple sub-ideas.
You start with your big idea — the central theme or topic of your blog post — in the center. From there, branch out into main points or sections (the thicker branches), then delve deeper into each section with supporting details (the smaller branches).
A successful mind map captures the essence of each point concisely while still keeping everything interconnected —an exhaustive list visually laid out before you. Follow these three steps to create your very own mind map.
Step 1: Centralize Your Big Idea
Your first step is identifying and placing the central theme at heart. This serves as both your anchor and compass — it holds all other ideas together while pointing them in the right direction.
Step 2: Branch Out With Main Points
Branched off from this core are what we call “Main Points” that serve as guides for structuring your outline further by breaking down bigger concepts into digestible chunks.
Note: If any particular branch starts to feel overloaded, don’t hesitate to split it into more manageable sub-branches.
Step 3: Fill In The Details
The final step is filling in each branch with supporting details. These could be anything from examples and statistics to anecdotes or personal experiences — anything that helps strengthen your main points and adds depth to your blog post outline.
Mind mapping can be a great way to unlock creativity, foster productivity, and help organize ideas. It unlocks creativity and boosts productivity in a big way. 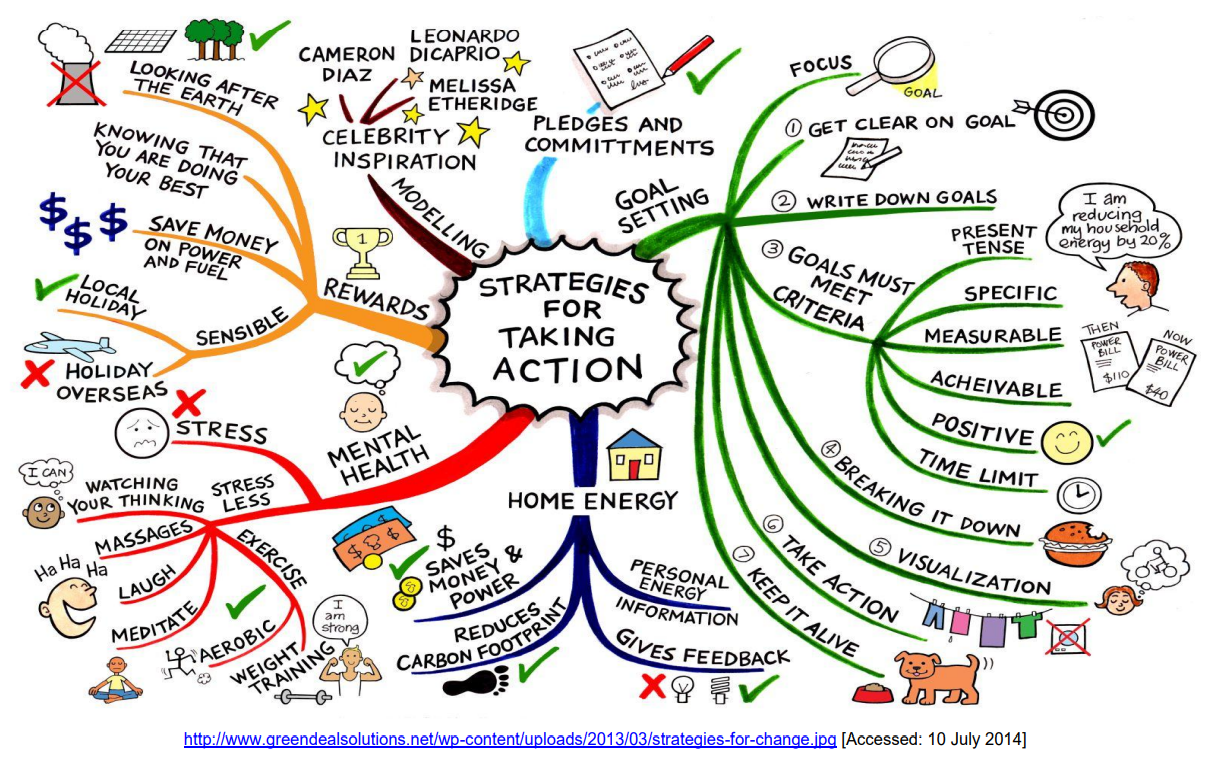
Here’s an example of mind mapping for an essay from The University of Adelaide
Crafting Compelling Titles for Your Blog Posts
Think of your blog post title as the window display of a shop. It’s what draws people in, right? So it needs to be enticing.
A well-crafted title using the B.R.A.V.E. acronym can significantly increase click-through rates. BRAVE stands for Bold, Relevant, Action-oriented, Value-adding, and Engaging. This acronym is your new secret weapon for crafting compelling titles.
Be bold and make a statement. You need your titles to stand out amidst an ocean of online content.
Add relevance by addressing search intent. Your blog post titles should not just attract traffic but draw visitors who are genuinely interested in what you offer.
Inspire action through command words. Action-oriented language draws attention immediately and helps drive engagement through the roof.
Showcase value right off the bat. If readers don’t see value in the title of your blog posts, why would they bother clicking on them?
Sell engagement, not just information. Make sure potential customers find engaging elements within your blogs to keep them coming back for more.
Crafting compelling blog titles isn’t just about being catchy. It’s a delicate balance of relevance and engagement — a secret recipe to boosting your blog post read count.
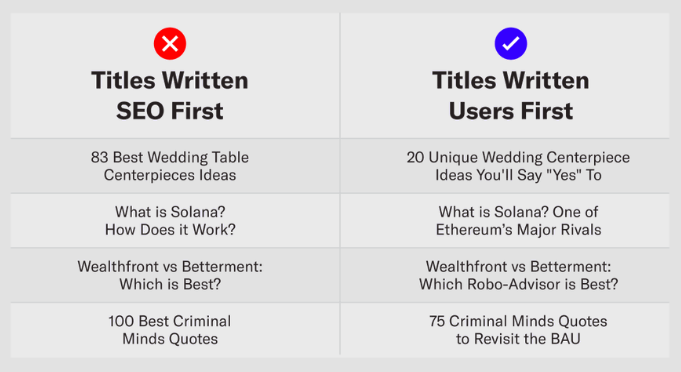
Siege Media founder Ross Hudgens illustrates the difference between writing for Google and for users
Structuring Your Blog Post Outline
Writing a successful blog post begins with constructing a solid outline. It’s like the blueprint for your final masterpiece.
A well-structured blog post outline template usually includes four main sections: introduction, main points, sub-points, and conclusion — each playing a role in keeping readers hooked to your content.
If you’ve ever written news articles or press releases, you might be familiar with the Inverted Pyramid method. But did you know that this technique can also be applied when outlining blog posts?
This strategy involves placing the most vital information at the top of your article (the broad base of the pyramid) and then gradually narrowing it down to less crucial details towards the end. This blog post structure ensures that even if readers don’t stick around till the very last sentence, they still walk away with essential knowledge about what they came searching for in the first place.
The ‘introduction’ is where we capture our reader’s attention by stating why it’s worth their time to read further. This could involve introducing them to a problem they may not have realized existed or offering an attractive glimpse into how their life will improve after implementing advice from your blog post.
‘Main Points’ are basically meaty chunks within which lie core arguments or steps toward resolving the issue mentioned in the introduction.
‘Sub-points’ are there to support each main point with additional details, examples, or anecdotes.
The ‘conclusion’ is where you wrap things up. Review your main points and bring everything together in a captivating way, urging your reader to act. Maybe that action is subscribing to your blog or perhaps sharing your content on their favorite social media platforms. 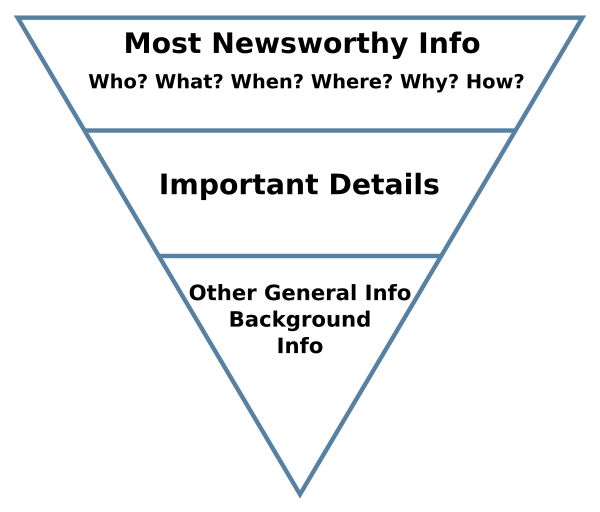
Source: Wikipedia
A Step-by-Step Guide to Writing a Blog Post Outline
Below we will show you the manual process of how to write a blog post outline as well as how the BrandWell automatic blog outline generator simplifies the entire process.
1. Choose a Topic for Your Blog Post
Keyword research plays a crucial role in creating an effective blog post outline. Keywords are the foundation of every content marketing strategy, and prioritizing keywords based on competition and search volume can significantly impact your content’s visibility online.
The first step in creating a compelling blog post outline is to identify your target keyword. This isn’t just about finding a popular search term; it’s about understanding what your readers are looking for and how you can provide value.
Start by brainstorming main ideas or topics that relate to your business, product, or service. These could be questions that customers often ask, brand names they might search for, or comparisons between different products in your industry.
Once you have this preliminary list of potential keywords, run them through an SEO tool to refine and expand on these terms. BrandWell’s keyword research tool will not only show you the search volume and ranking difficulty for each keyword but also suggest related phrases that could be ripe for the picking.
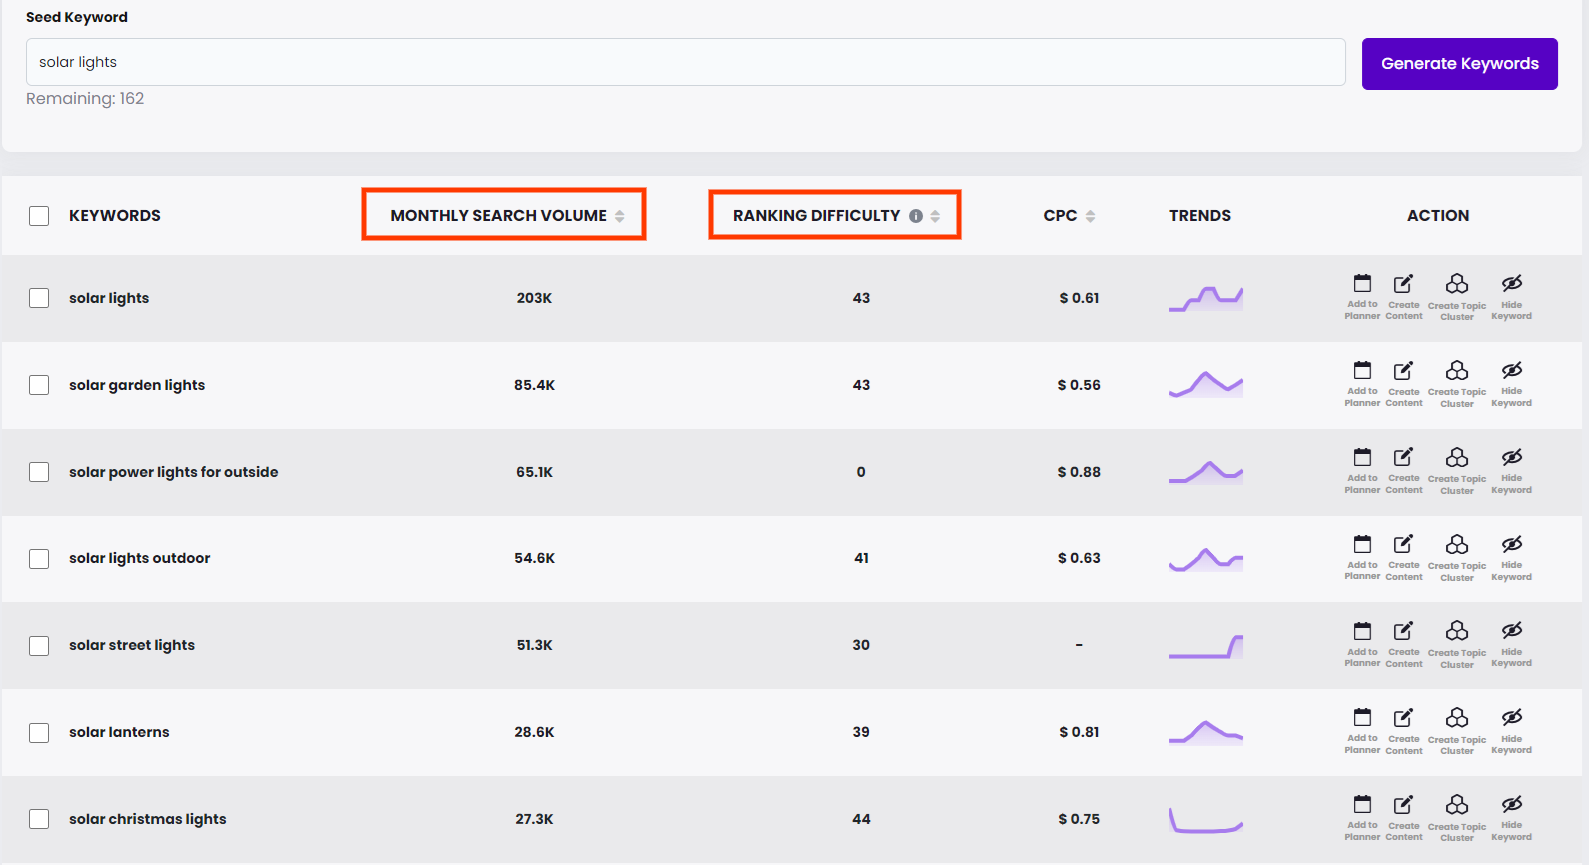
A crucial part of this process involves analyzing the top-ranking pages for each of your chosen keywords. Look at which additional keywords your competitors are using and consider incorporating some into your content where relevant.
When building your keywords list, look for factors such as competition level (are high-authority domains dominating?), relevance (does it fit naturally within my content?), and user intent (is this what my audience really wants?).
If a keyword has too much competition from higher authority sites, try focusing more on lower-difficulty alternatives instead.
Ask yourself these questions:
What would I type into Google if I were looking for information?
What problems does my product/service solve?
What questions might my customers have?
Remember, the goal isn’t just to rank higher on search engines but to provide valuable and engaging content for your readers. By starting with the right target keyword, you set a strong foundation for an effective blog post outline.
2. Determine Your Main Points
Once you have chosen a particular keyword to write about, it’s time to compose the actual sections of your blog outline. The Google search results page (SERP) is a great resource for finding possible supporting points that could stand as individual headers for your article.
One area I like to look at is right at the bottom of the page where you will find related searches:

That Google is showing these means there are people searching for them. While making your article more comprehensive, optimizing for these keywords will also boost your article’s traffic potential.
Another SERP feature you should check when researching sub-topics is the People Also Ask carousel.
People Also Ask (PAA) queries are great to target for informational articles as they offer another opportunity for clicks outside ranking for your target keyword.
What I like is that, while Google only shows a couple of PAA questions as a default, it will suggest more with every selection you make. So keep clicking those that make sense for your article until you find one that fits perfectly with the angle you intend to take.

3. Draft Your Outline
If you are doing this manually, you will now be opening your Google Docs and putting all that research from the last two steps into a draft outline.
Since we want to save time for the actual writing, we will let our blog outline generator take over from here.
Open the BrandWell app and navigate to RankWell in the left column. Choose a project name then hit the Write Article button. The app will prompt you to choose the base of your content — from a keyword, an existing blog post, a YouTube video, a podcast episode, a custom audio file, or a Word/PowerPoint/Doc file.
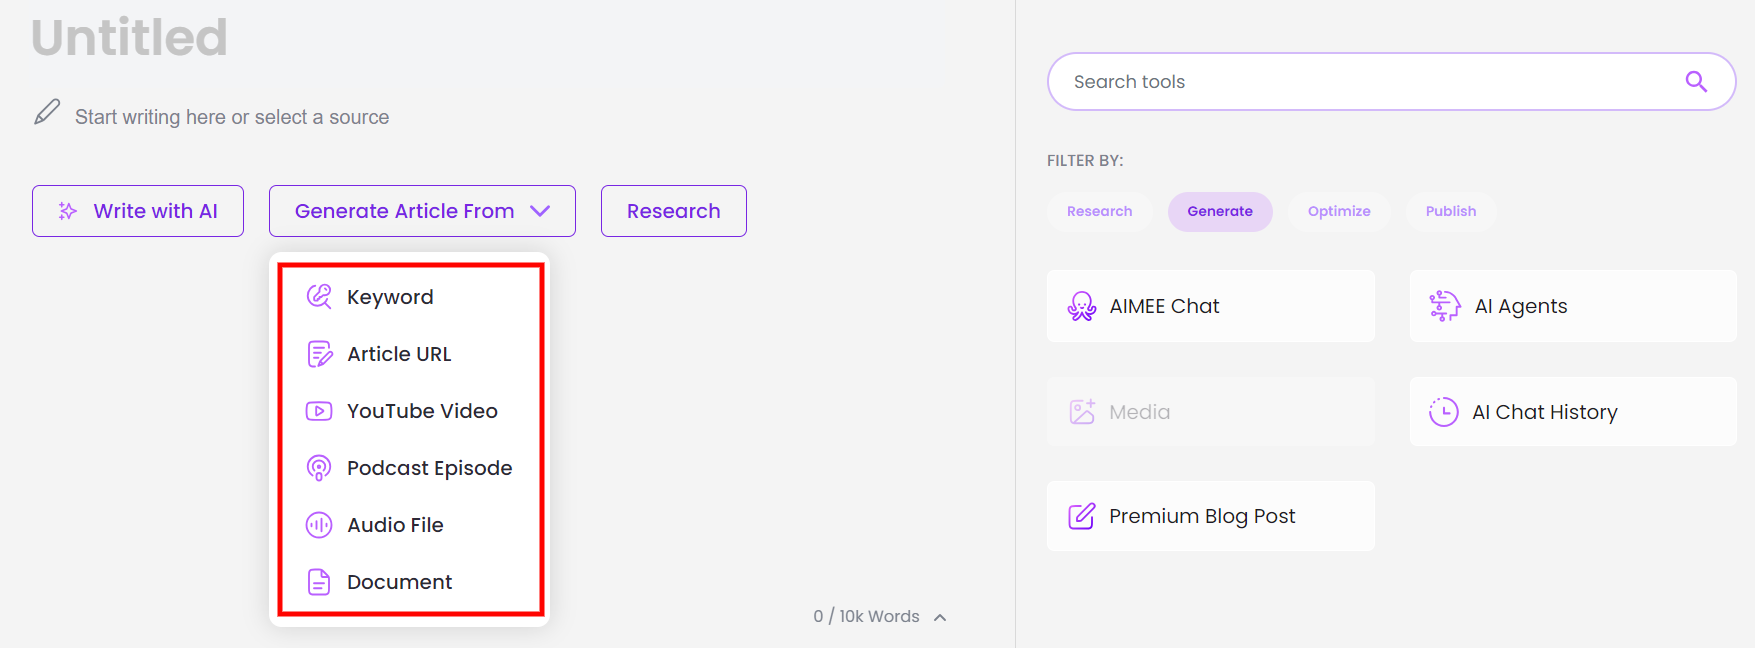
On the next page, enter your main keyword. In this example, our topic and primary keyword is how to write a blog post outline.
Since we are only concerned about the outline in this article, we will not choose a word count. Otherwise, if the AI is writing the article, the word count field offers a dropdown of options to tell the machine how long you want the article to be.
RankWell is one of the few long-form content writers that allow you to create custom blog outlines. On the Customized Brief panel, you can add your blog title (if you don’t want the AI to generate one for you) and then modify the headers that the AI suggested.
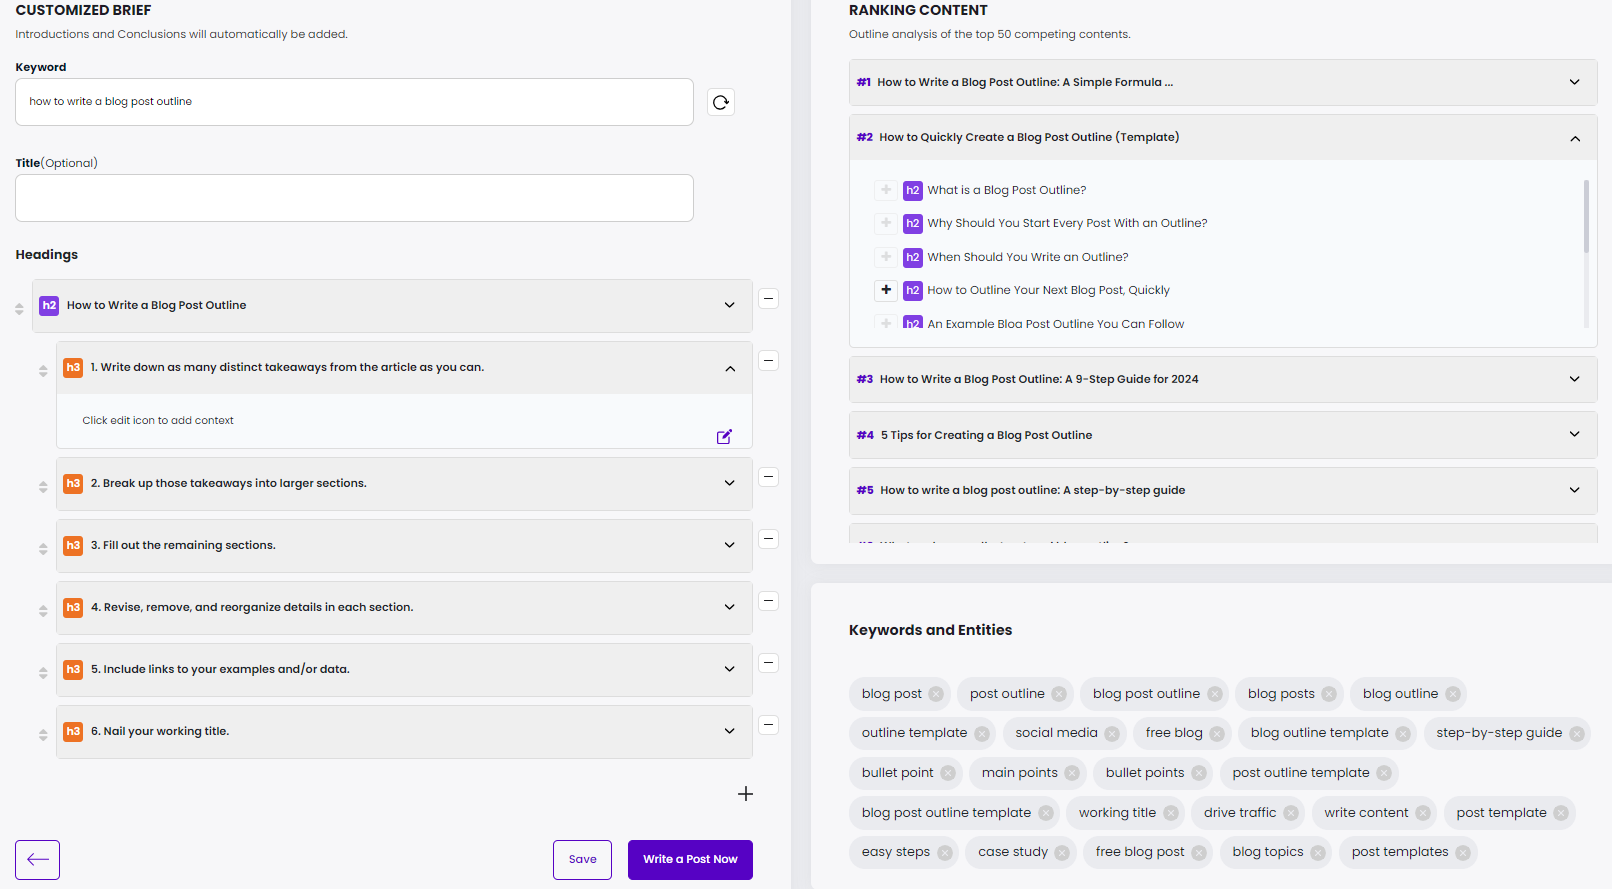
That outline’s main points are already ordered the way I feel will give my article the most logical structure. All it needs are a few tweaks to optimize for some of my target keywords.
If you are writing the article yourself, you can simply copy the draft outline and paste it into the document editor of choice.
Otherwise, you can click the Write a Post Now button so the AI writer can complete the process. After hitting the button, you will be asked to wait a few minutes while the AI writes the article.
Yes, minutes! That’s how fast the AI machine will write a long-form article that will be ready to publish after a quick review.
4. Arrange Your Points Logically
Our outline already has a logical flow but in case the outline generated omits some points or isn’t as logically structured, the custom brief tool offers a few remedies.
If you don’t like the order or wording of the points on your outline, you can toggle the circular arrow icon and the AI will suggest another outline.
You could also check and remove the points you don’t like, or add custom headings for the points you feel the AI missed.
At this point, your blog post outline is all but done. But if you wish, you can go a step further.
5. Break Your Main Points Into Subtopics
As you write or during the optimization process, you may decide to add an H3 or H4 heading to optimize for a secondary keyword target, address a sub-topic, or break up a long section of the text.
That is OK because the original outline is only there to order your thoughts and guide your writing process, not something you will be graded on.
Ideally, each H2 heading should have 2-3 sub-points. For some of these, consider writing them as bullets. This makes the information more digestible.
6. Write Your First Draft
With your outline ready, it’s time to write your first draft. Expand on each point that you wrote down, and then connect each point with the next for a seamless flow.
While you can write your own posts, it can be hard to find the time. And, if you go that route, it is hard to find and manage writers who produce long-form articles at a consistent level of quality.
The RankWell long-form SEO writer allows you to scale your content production without sacrificing quality.
In addition to generating a blog outline and writing the article, RankWell can do a lot more, including adding:
- Key takeaway boxes that summarize your article for busy readers.
- Click to tweet links that encourage readers to share your content.
- FAQ boxes that help Google understand what your article is about so it can show it to the right people.
- Automatic internal and outbound links that help readers learn more about the topic and assist Google to easily discover your content.
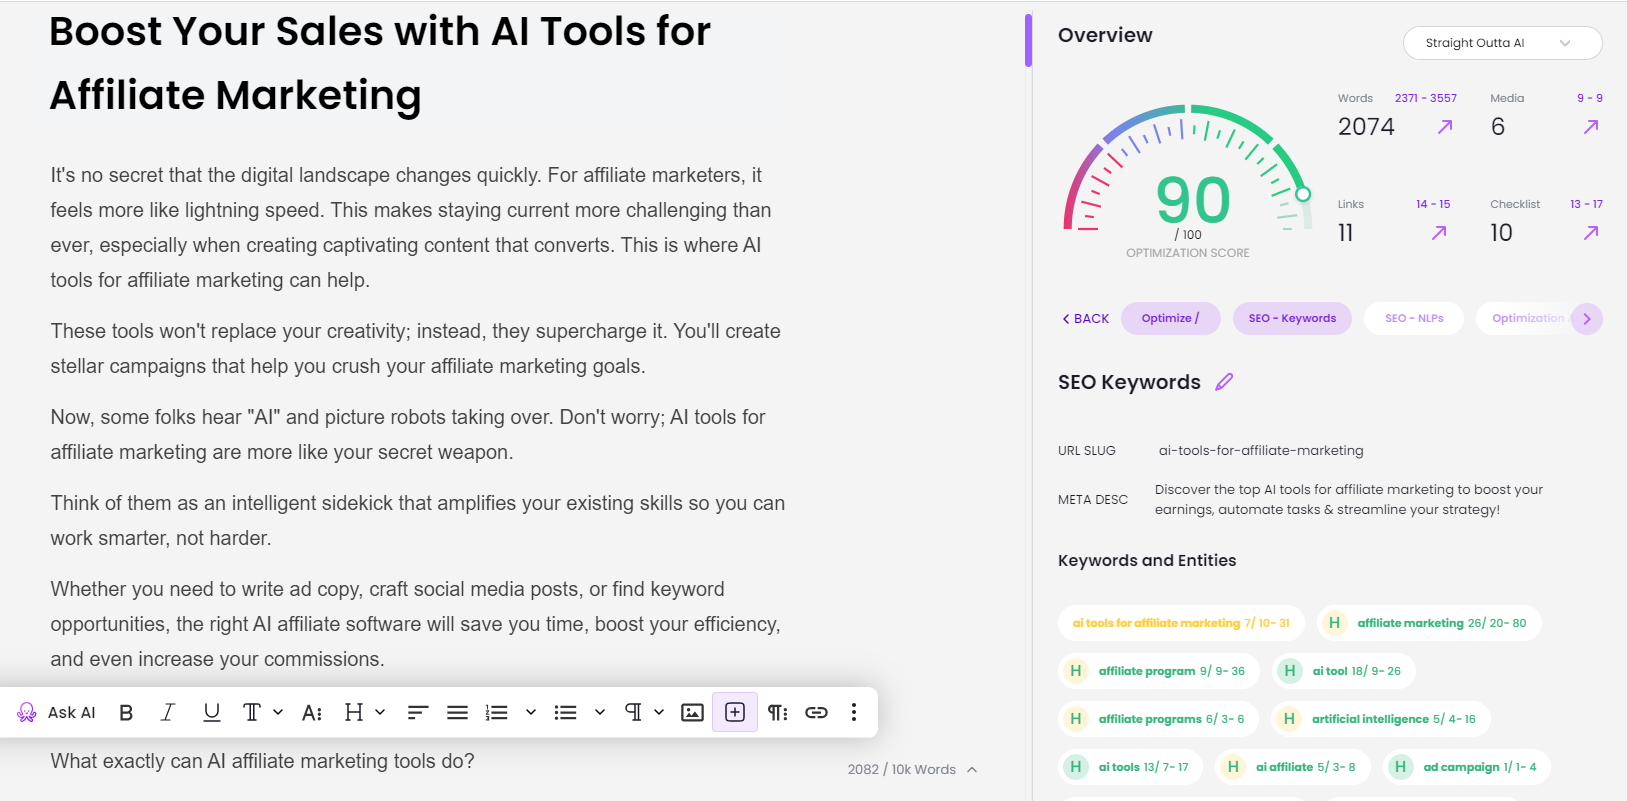
The AI will also generate a table of contents with jump links that help readers quickly navigate to the parts of the article that most interest them.
The AI writes in a conversational tone, which means the content is human-like and passes AI detection checks. And with a proprietary plagiarism checker built into the tool, you can also be sure your articles are original.
Since RankWell gives you the option to add keywords in bulk, your article comes fully optimized for your target keywords. But just to infuse some character and brand voice, you may weave in a few personal stories, add images, and make a few editing touches before you publish the article.
Speaking of publishing, if you are using the WordPress CMS, you can publish the article on your site without leaving the CAS app. We have a WordPress plugin for that.
Oh, and your subscription also comes with metadata and featured image links that are synced to your WordPress site.
All in all, RankWell ensures that the articles it generates are pre-optimized for organic search, comprehensive, and easy to digest.
RankWell radically streamlines the standard blog post workflow, saving you hours of time. The AI writer shrinks the cost of a 3,000-word article that would take an accomplished SEO writer hours – even days – to research and write shrinks to an average of $15.
FAQs – How to Write a Blog Post Outline
What is an outline for a blog post?
A blog post outline organizes your thoughts and research, setting the stage for smooth writing. It maps out sections like introduction, main points, sub-points, and conclusion.
How do you structure a blog post?
To structure a blog post effectively: start with an engaging intro, present your main points clearly in the body using headers/subheaders, and wrap up with a strong conclusion featuring a call to action.
How do you write a blog post layout?
Create your layout by crafting catchy headlines for each section. Add bullet points or numbered lists to break down complex ideas. Keep paragraphs short and add visuals where needed.
How do I format my blog post?
The key to formatting is readability — use bold text for emphasis, italicize keywords when appropriate, incorporate white space between sections, include images that complement the content, and hyperlink relevant sources or related articles.
Conclusion
Writing a blog post outline may seem like an extra step, but it’s one that can save you a lot of time and frustration in the long run.
By taking the time to plan your blog post upfront, you can ensure that your writing is organized, focused, and engaging.
Struggling to find time to write an outline for every blog post? Automation is the answer! With BrandWell, all you need to do is enter your long-tail keyword and it will generate a blog post outline for you within seconds.
Sign up here and get started scaling your content production and publishing right away.